


World 2 begins with a bang, Quick handling the miniboss Abductor with Demi. This would be the go-to attack for many non-Heavy bosses and sub-bosses from here on.

After the solo Galuf sequence (in which Galuf becomes a Samurai and uses !GilToss to win an easy battle with Gilgamesh) Quick had a more-difficult-than-expected roadblock in the Big Bridge. In this sequence, the party fights one story battle with three comical Lil' Chariot enemies. Individually, they would be no problem, but facing three was more difficult than many of the boss battles I'd recently fought.
These little wheelie robots have good Speed, decent Attack (with the possibility of using a Critical attack for even more damage), and a magical (not row-dependant) attack called Mustard Bomb that inflicts HP Leak status after dealing 300 direct damage. Quick's relatively low Vitality and HP total made three Mustard Bombs an instant game over.

Thankfully, they aren't immune to Slow, nor are they Heavy. They have a weakness to Lightning that I could have exploited with a broken rod, but I wanted to avoid that if I could. The problem was the inability to target more than one of the Chariots in any given round. Quick would have to start each battle with a casting of Haste, then go to work with either Regen or Slow. After his first action, the Chariots would get their turns and start pummeling him. Quick had to run the battle a few times to avoid enough Mustard Bombs to set up Haste, Regen, and three castings of Slow.
After the Lil' Chariots, there are certain trigger points on the bridge that will bring up monsters from the sea or from farther down the bridge, but these tiles are all avoidable with a certain route. Quick would be running this bridge enough times to memorize the battle-free path, although I didn't know it at the time.
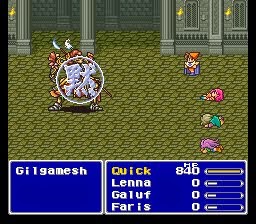
Halfway across the bridge, the party runs into Gilgamesh for the first real encounter. Halfway through his HP, he buffs himself up with Haste, Shell, and Protect, but Quick didn't get to see that second form on the first attempt.

Coming into the battle at Level 28, Quick was the same level as Gilgy, and thus his first-round Goblin Punch clobbered Quick. Gilga likes this move, but it's a bit strange, because most casual parties will be well below level 28 at this point in the game, and would never see the huge damage multiplier. Sadly, I had no choice but to withdraw—knowing that I'd have to fight the Lil' Chariots again—to gain a level before attempting the battle again.
Hitting Level 29, I could take on Gilgamesh again. After more failed Lil' Chariot attempts, I made it back, only to be obliterated when he went into his second, jumping form. Quickly, when Gilgamesh is damaged to fall below 2500 HP—a little over halfway through his total of 6500—he reacts with some humorous dialogue and an uninterrupted string of Haste, Protect, Shell, and a Jump attack. After this trigger, his AI routine ignores the less-threatening Blue Magic spells and goes into an attacking and Jumping frenzy. This Jump attack is actually magical, and Gilgamesh is the only enemy in the game to use it, so it deserves a quick explanation here.
Magical attacks all have an attack power (A) just like physical weapons. They are also modified by level-based multipliers, although the formula is slightly different. For magical attacks, M = (Level * Magic Power / 256) + 4. Notice that the growth will be slower than physical damage, but starts higher at 4 rather than 2. The A of the enemy Jump ability is 105..118, Gilga's Magic Power is actually 0, and Quick's Magic Defense is 13, so let's crunch!
A = 105
M = (28 * 0) + 4
(105 - 13) * 4 = 368
On each Jump, Gilga would do at least 368, but he could do up to 420. Astute readers will note that Gilgamesh reacts with this triple-buff plus attack. This means that it is in the code as a counterattack, and thus not part of his usual routine. Gilga will often get his regular turn immediately after this reaction, giving him a chance to use two high-damage Jumps in a row. I discovered the hard way that if Quick was at anything less than full health before dropping Gilga below 2500, game overs and multiple battles with Lil' Chariots were waiting.
Thankfully, the Mage Masher dagger from World 1 can inflict Mute status upon a successful attack. After several attempts—and many more Lil' Chariot battles—I lined it up correctly. Mute landed on Gilga just before the reaction spells. They all failed, and Quick was able to outlast Gilgamesh for the tough win.

After clearing the Big Bridge, the party is blasted to a different continent, and has access to a new town and new spells.
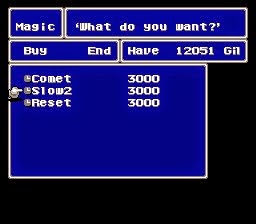
Slow2 functions just like Slow, but targets all enemies at the cost of some accuracy (80% to Slow's 95%). Reset is a unique spell that resets any battle to its original state: HP totals, item counts, statuses, etc. I learned that it can even be used to reset a Back Attack to a normal battle, since it seems to roll up the battle as if it was just encountered, and this includes the Back Attack check.
Comet is the first direct damage spell the Time Mage can pick up. It is an inexpensive spell to cast, but its damage is quite variable. Here's the damage formula: (50..200 - Magic Defense) * 8. That's right, a random number between 50 and 200, multiplied by 8. Notice that Magic Power and Level do not factor into this formula; the spell will do the same damage regardless of Quick's level. This sometimes works in his favor, as damage would be unaffected by level-reducing enemy spells like Sonic Wave, but the damage would not scale up as Quick advanced. For now, Comet would be a cheap, effective, and random source of direct damage.
After grabbing the new spells, I worked through the short Moogle side quest. At the end of the cave, I tried to fight the Bone-a-saur head-to-head, forgetting that it can use ????, which deals damage equal to damage taken. In other words, an instant kill. After walking through the dungeon again, I took the easy way out.


After grabbing the Exit spell in Bal Castle—for easy escape from battles and quick warps from dungeons—I picked up some Venom Rods in Kelb Village and proceeded to the Hiryuu Valley. The boss at the end of this short mountaintop dungeon is susceptible to a number of statuses and techniques, so I checked the Algorithms Guide and found what I was looking for.


This plant does nothing but revive its little Garden of Death—five flowers that attack and inflict nasty status ailments. It can only revive the flowers when it gets turn, and thus can't bring them back if it can't act! I broke a rod to kill the flowers and followed up with Stop. This overgrown flower isn't even Heavy, so Stop lasts much longer than it would on a normal boss, giving Quick the chance to attack while keeping it stopped in perpetuity. Lack of Heavy status also makes the plant vulnerable to Demi spells, so Quick drained most of its health with Demi before finishing it off with Comet.
The Battle with Gilgamesh and Enkidu before the Barrier Tower wasn't very challenging for Quick; both can be hit with Slow, and Enkidu can be drained out with Demi. Comet provided all the direct offense from the safety of the back row.

In the Barrier Tower, I ground out a Wall Ring, which provides permanent Reflect status. This is usually necessary to beat Exdeath later in World 2, but I wasn't sure if I would need it or not. Going into battle with the Wall Ring equipped meant that Quick couldn't cast Haste on himself. I didn't know if this tradeoff would be beneficial in any upcoming World 2 battles, but the Barrier Tower becomes inaccessible after the boss, so I played it safe and fought Reflect Knights until I got the rare drop.
Atmos awaits at the top of the Barrier Tower. Its gimmick is to kill a character with double-casts of Comet, then suck the dead characters into the Void—out of the battle. If any characters are dead, they are slowly pulled across the screen until they are pulled into the next dimension, at which point Atmos goes back to work with its Comets.
The standard solo literature suggests going into battle with only one character dead, killing them off one at a time while the solo goes to work on Atmos' massive 19997 HP. Other solos can run it out of MP, nullifying its Comets, but I decided to stick with what's best. Killing off the other characters one at a time, Quick took down Atmos with some Comets of his own.

In the next small dungeon, most random battles are with Metamorpha enemies. These enemies begin the battle as an old man, and shift into one of several forms on their second turn. When killed in the old man form, they have a rare chance to drop an item Quick would need soon.

The old man form is vulnerable to confusion, so Quick pulled out the Dancing Dagger, which he had picked up in the Moogle Village. When used to attack, this dagger has a chance to mimic the !Dance ability, choosing from four different Dances. One of these Dances inflicts Confuse status, which would keep the old man from transforming. The odds of landing it (50% to Dance, 25% to use Tempting Tango, or 12.5% on each attack) were low, but Quick was able to grind out two Light Staff items without too much trouble.

After Guido's Cave, we head to the enchanted Forest of Mua. The large groups of enemies cough up loads of EXP and gold, and were easily dealt with using Slow2 and Comet.

At the end of the forest, I faced the unnamed enemies, usually just called, "Crystals" or "Seal Guardians." Each of these is attuned to one of the four elements of the World 1 Crystals: Fire, Water, Earth, and Air. All of the crystals absorb their respective elements and are immune to poison, ice, and lightning.
Each Crystal simply attacks over and over until their HP drops to the critical range (below 3000), at which point they enter a dangerous AI routine, using an all-targeting third-level elemental spell over and over. I learned that this is doubly dangerous for solo characters, as the spells lose their all-targeting penalty to damage when only one character is alive.
Most solo characters wear the Fire Crystal down to critical with the Flame Ring equipped, relying on its Fire3 spells for full healing as they take the others out one by one. Quick didn't have to resort to that, as these dangerous diamonds are vulnerable to gravity-based spells, including my new spell Quarter (Qrter). The name of this spell is actually a bit misleading, as it reduces the target's HP by 14/16 (87.5%). One successful casting of this spell—the Crystals dodged many of them, being Level 77—would reduce the target to under 1000 HP.
I hit them all with Slow, waited until one would attack, hit it with Quarter, and finish it off before it could get another turn and cast its killer spell. The plan went off without a hitch on the first try.

After the Crystal battle, Galuf fights a solo story battle with Exdeath. Normally Galuf has to deal a specific HP damage amount to progress the battle, which would have taken a long time at his low level. By equipping Galuf with the Bone Mail—which gives the character Undead traits—Galuf can force the battle to end without dealing thousands of plinky damage by using a Phoenix Down on himself.

It was then time to have our real showdown with Exdeath. He waits at the top of his massive tower, protected by some tough enemies and some decent new treasure—but nothing of note for Quick.
Exdeath has a massive HP total (32768) and a collection of nasty attacks. In his first AI routine, he uses a wide variety of abilities and skills, chosen at random. Condemn often pops up on his first action, and is a killer for most solos, but not for the Time Mage. Reset brings the battle back to the first round, where Exdeath must re-roll his first action. Eventually, he would use Fight on his first turn and the battle could start for real.


I fought all those battles with Metamorpha enemies earlier in Guido's Cave to get my hands on Staff of Light items. When equipped and broken in battle, these items cast the White Magic Spell Holy, which is the only elemental weakness of this iteration of Exdeath. With the weakness negating his Magic Defense and doubling the damage, each Light Staff dealt over 5000 damage.

This is important because Exdeath's opening AI routine is much more dangerous than his Critical routine that opens up when he is under 16000 HP. When below half health, Exdeath takes two actions each round, delivering heavy physical attacks and third-level elemental spells. In the back row, Quick could reduce the damage dealt by the physical attacks, and with the Flame Ring, Ice3 was nullified and Fire3 was absorbed. Bolt3 still dealt full damage, so I would have to rely on some luck to avoid too much lightning damage.
Normally, solo characters take the Wall Ring into this battle and rely on Exdeath bouncing spells in his second AI routine, but the Wall Ring would keep Quick from casting Haste on himself. Not only that, but Exdeath has a special reaction to the Slow spell—he casts Haste on himself. His Speed of 50 is already significantly faster than Quick's Agility, so I would need every speed advantage I could get.
I tried Exdeath at Level 36, but Quick was crushed by L3 Flare—which hits any target with a level divisible by 3—so I took Quick back down a floor to gain a level. The enemies here have an array of instant death spells like Break and Doom, but the enemies are vulnerable to Confuse, and Doom can be reflected with the Wall Ring, making for some quick battles.

At Level 37, Quick was able to take down Exdeath without much trouble, breaking Light Staff items in the first phase and playing defensively in the second phase, hitting him with Comets when it was safe to do so.


Exdeath eliminated, it was time to continue to World 3.
No comments:
Post a Comment